That steady drip-drip-drip isn’t just annoying; it represents hard-earned money washing down the drain. While professional service calls often exceed $200, fixing the issue yourself costs a fraction of that price. You might wonder, “Do you need a plumber to replace a bathtub faucet?” For most standard fixtures, the answer is a confident no.
Your tub can look a decade older than it actually is simply because of one crusty, calcified fixture. Swapping it out offers a high-impact upgrade that instantly refreshes the room while boosting your DIY confidence. There’s distinct pride in maintaining your own home without calling for outside help.
This project breaks the job into simple actions, from shutting off the water to twisting on new hardware. Think of the assembly like a heavy-duty jar lid: if you can apply steady pressure, you can master the mechanics. It’s time to fix that leak in under an hour.
1. Assemble Your DIY Plumber’s Kit
You likely already own most of the gear required, but how you handle these tools determines whether your new faucet looks pristine or scratched. Standard pliers have serrated teeth that will instantly gouge chrome, so use an adjustable wrench instead. For extra insurance, copy a pro tactic: wrap a rag around the fixture to create a protective shield between the metal and your tool.
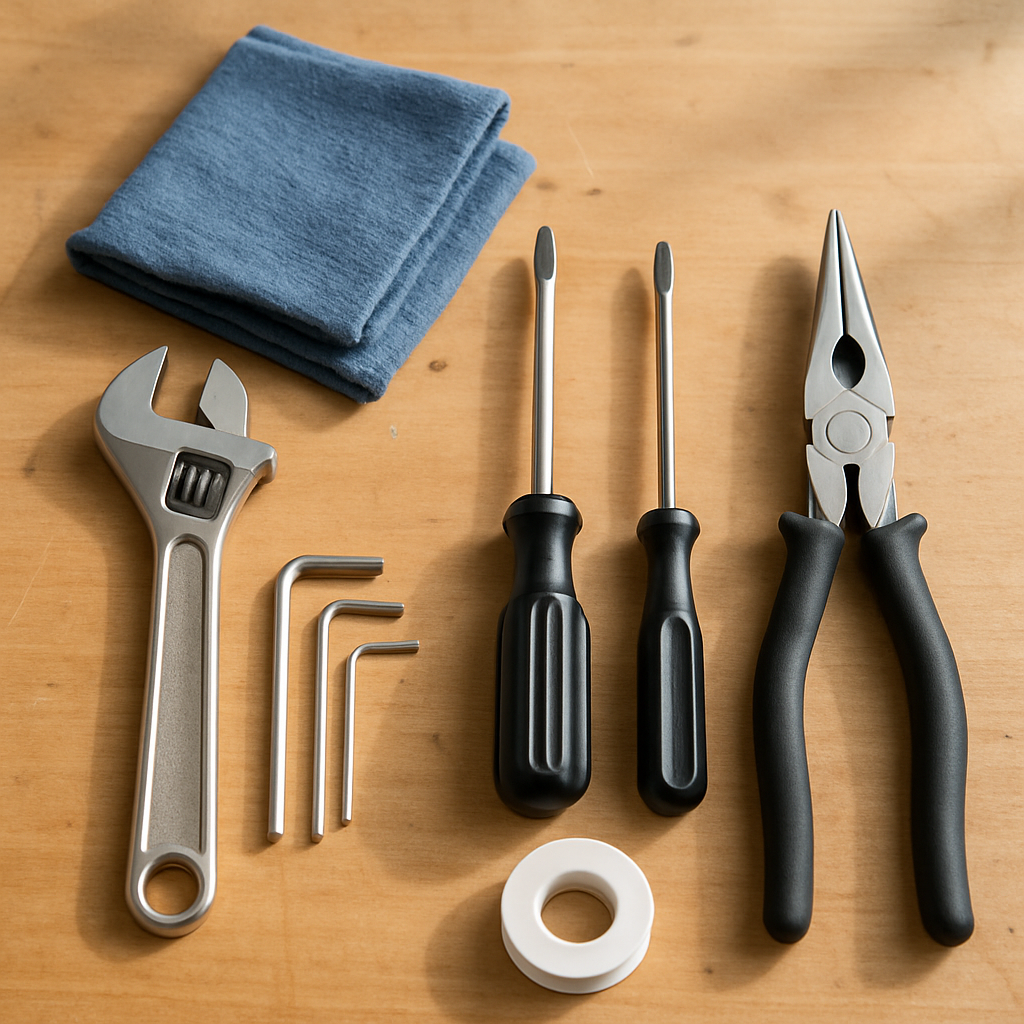
Gathering the right tools upfront prevents mid-job panic. You may need to purchase thread seal tape, which lubricates connections to stop leaks. Stick to tape rather than putty—it’s cleaner and better for threaded pipes.
| Tool | Purpose | Pro Tip |
|---|---|---|
| Adjustable Wrench | Loosening/tightening nuts without scratching | Wrap jaws with tape or a rag for extra protection |
| Screwdrivers (Philips & Flathead) | Removing handle screws and trim plates | Keep a set with various tip sizes |
| Hex (Allen) Key Set | Loosening set screws hidden in handles | Common sizes: 7/64, 1/8, 5/32 inch |
| Needle-Nose Pliers | Retrieving small parts or clips | Useful for holding washers |
| Plumber’s Tape | Sealing threaded connections | Wrap clockwise 3–5 times |
With your kit ready, locate your shut-off valves to ensure a dry workspace.
2. The No-Flood Guarantee: Finding and Testing Your Water Shut-off
Before loosening any screws, you must cut the water supply to prevent an accidental flood. Bathtubs often hide controls, so look for a square panel in the room or closet sharing the shower wall. Opening this hatch is how to access bathtub plumbing behind the wall without demolition. If you cannot locate these local valves, use the home’s main supply found near the water meter.
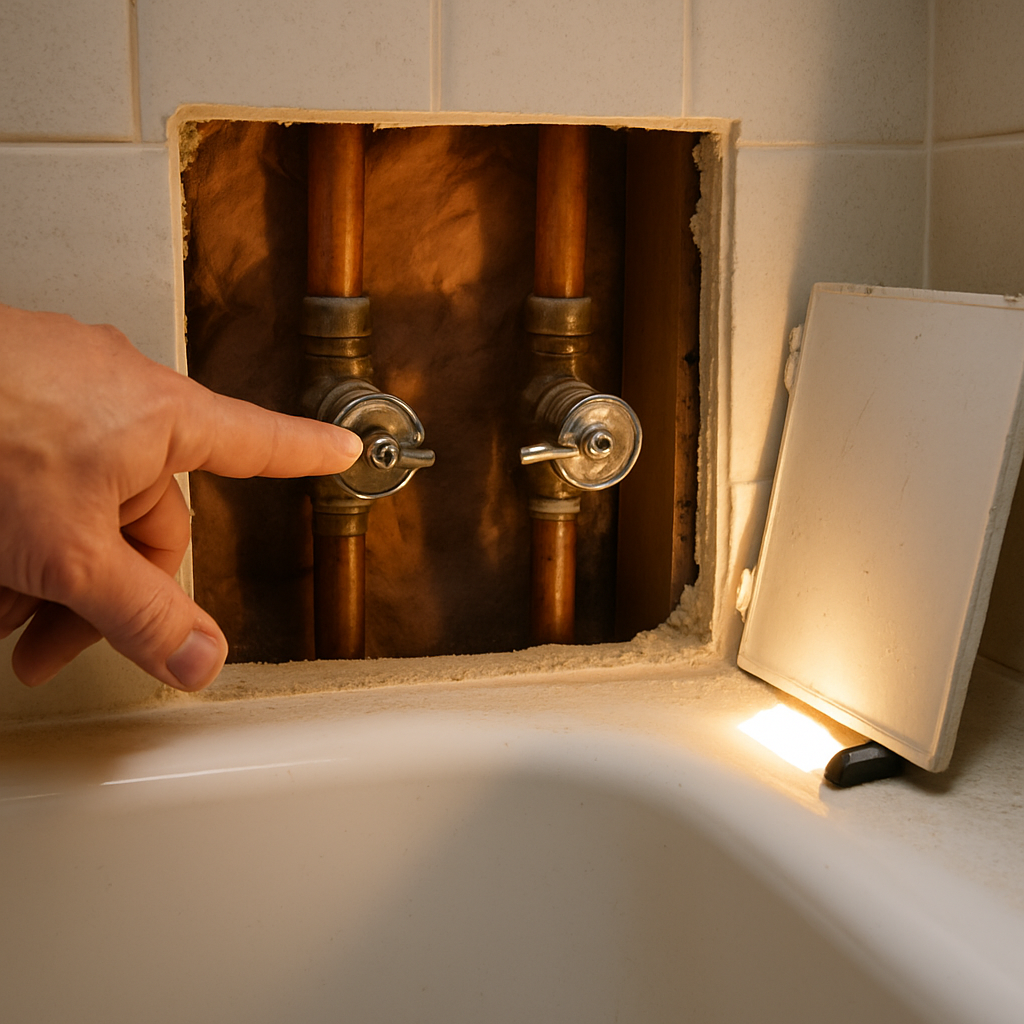
Secure the site by verifying the line is dry. Open the tub faucet; the flow should slow to a complete stop. Learning how to shut off water to the bathtub only is convenient, but if a steady stream persists, the local valve may be faulty—you must then use the main shut-off. You are safe to work once the faucet is silent.
3. Removing the Old Hardware Without Damaging Your Pipes
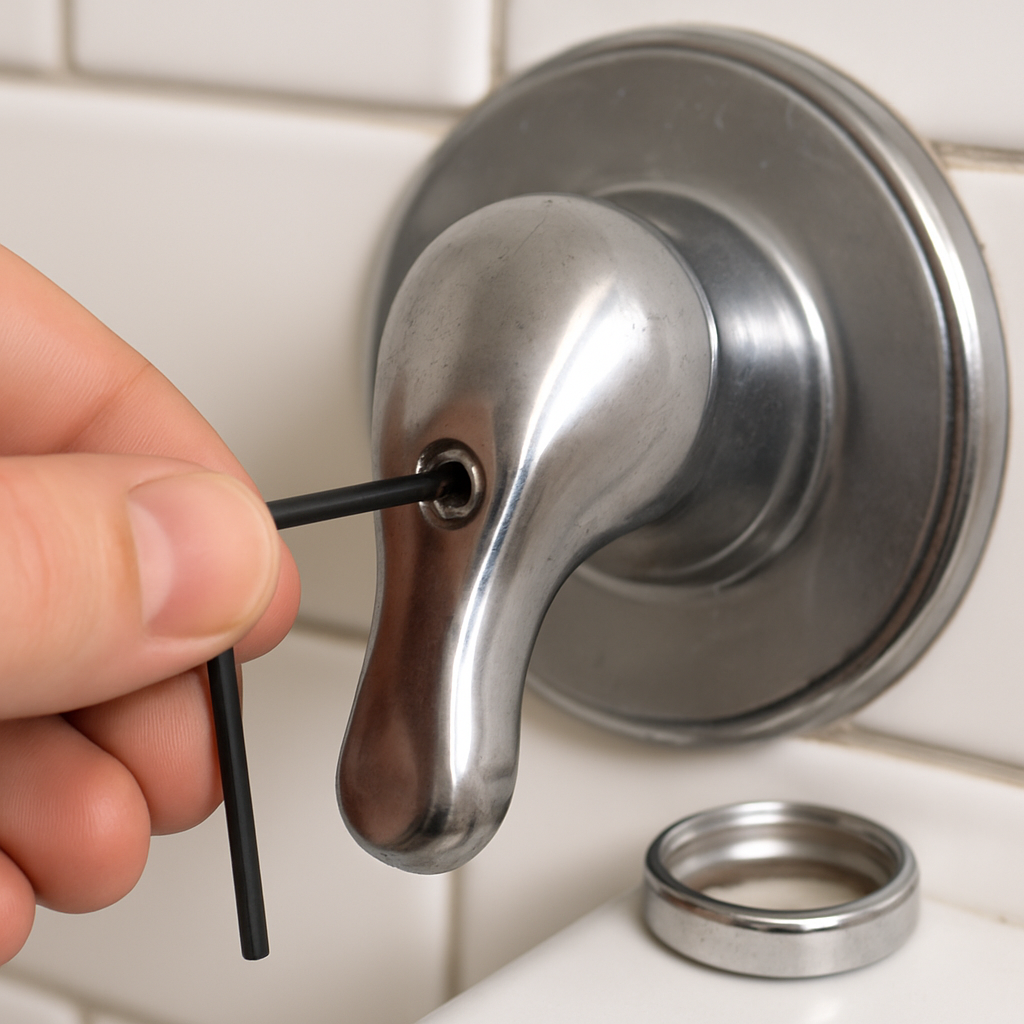
Most single-handle faucets are held in place by a tiny fastener called a set screw, often hidden beneath a decorative plastic cap or tucked into a recess on the handle’s underside. Use an Allen wrench to loosen this screw, but keep a firm grip on the handle to ensure it doesn’t drop and chip your tub surface. If you plan to replace the entire fixture, save these small parts in a cup to reference sizing later.
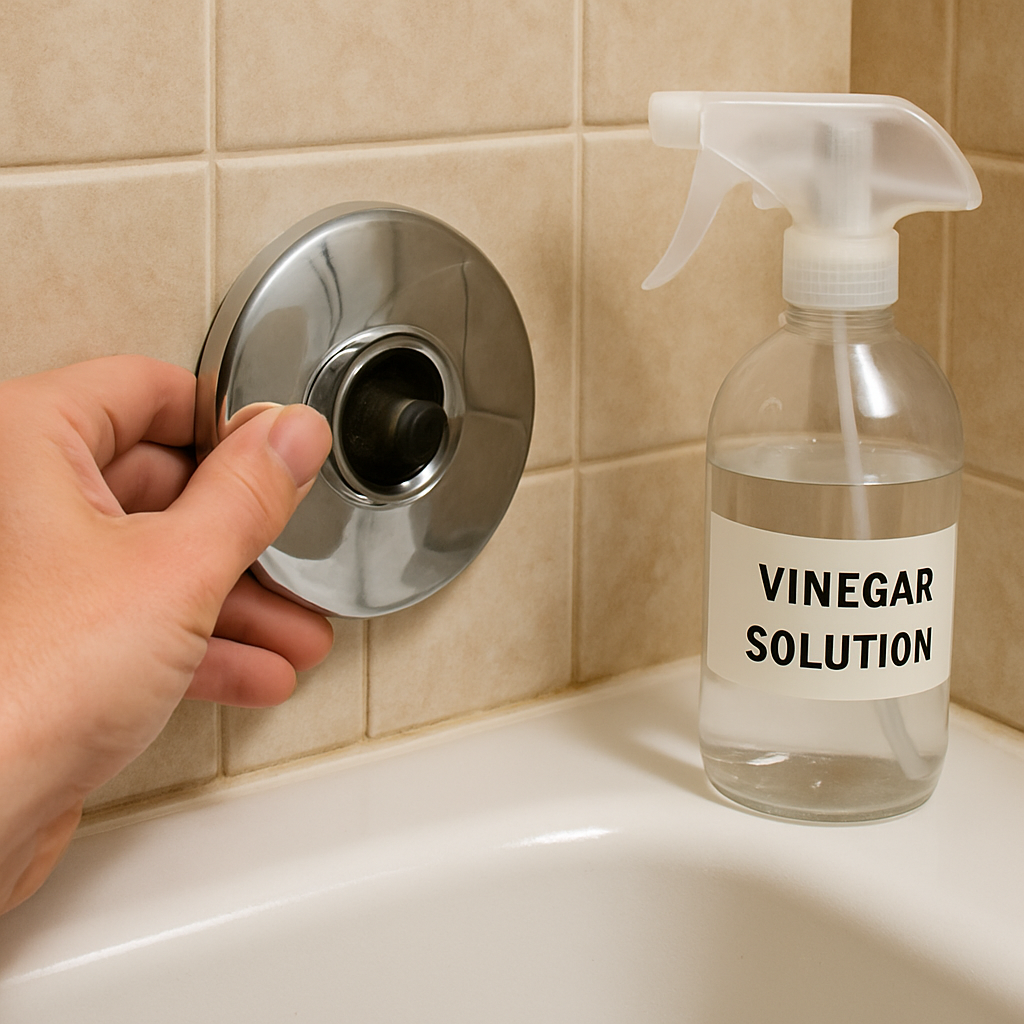
You will next remove the escutcheon (the decorative metal wall plate), which is likely glued in place by years of mineral buildup. Avoid prying with a screwdriver, as this can crack your tile; instead, apply the “Wiggle Technique”—gently rotate the plate back and forth to break the crusty seal. A simple vinegar spray can help dissolve these calcium bonds if you are struggling with how to remove a stuck bathtub spout or trim plate.
The exposed plastic or brass cartridge inside the wall is your best clue for finding compatible replacement parts. Manufacturers rarely print their names on the exterior trim, so examining the specific shape of the internal stem is how to identify the bathtub faucet brand without logo markings. Snap a clear photo of this mechanism to show the hardware store experts, ensuring you buy the correct kit.
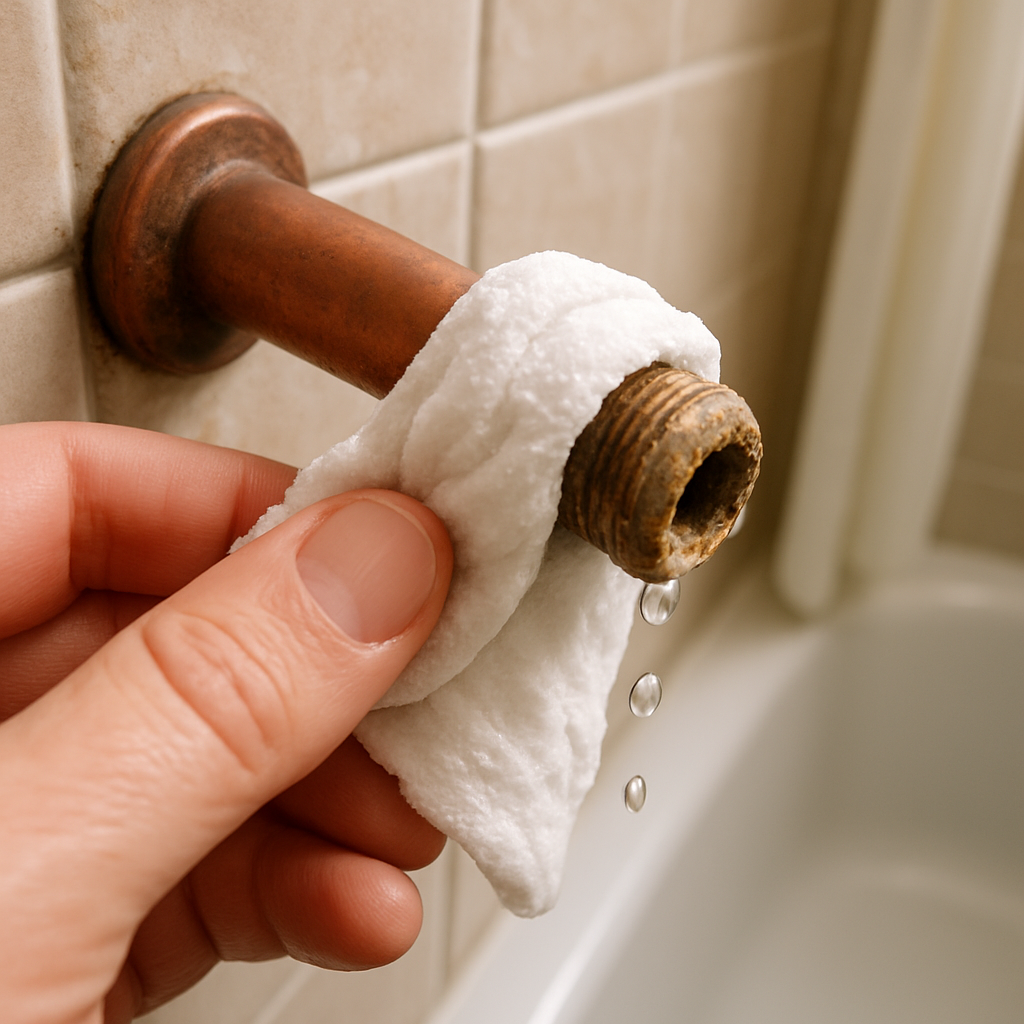
With the old hardware gone, you are left with exposed, likely dirty pipes. To ensure a watertight fit for the new fixture, clean these threads thoroughly.
4. Prepping the Threads for a Leak-Proof Seal
Staring at the exposed pipe, you might see white, crusty deposits that look like hardened toothpaste. This is mineral scale, but if you ignore it, your new faucet won’t screw on smoothly. A wire brush works well here, but a rag soaked in white vinegar is the secret weapon for removing calcium buildup from tub faucet threads. Wrap the saturated cloth around the pipe for ten minutes to let the acidity dissolve the grime, leaving clean metal ready for a fresh seal.
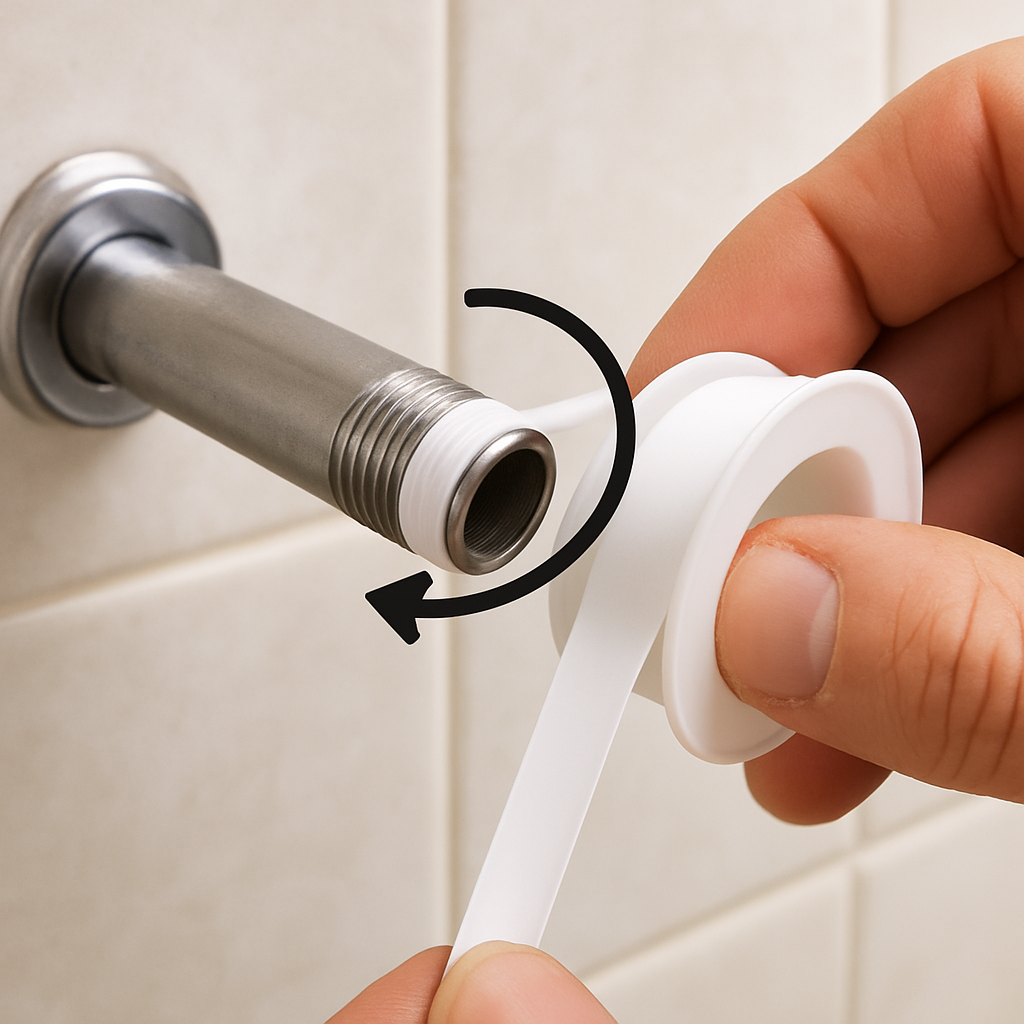
Once the threads are dry, you must waterproof the connection. While DIY forums often debate plumber’s tape vs plumber’s putty for tub fixtures, Teflon tape is generally the superior choice for threaded pipes. Unlike putty, which can dry out and crack over time, tape acts as a lubricating seal that fills microscopic gaps without creating a mess.
| Method | Best For | Pros | Cons |
|---|---|---|---|
| Plumber’s Tape (Teflon) | Threaded pipe connections | Easy to apply, clean, flexible seal | Not for compression fittings |
| Plumber’s Putty | Drain assemblies, sink flanges | Permanently soft, good for non-threaded seals | Can stain porous stone, dries out over time |
Applying this tape correctly requires following the “Clockwise Rule” to prevent leaks. Hold the pipe facing you and wrap the white tape clockwise—the exact same direction you will screw on the new spout. If you wrap it backward, the tape will simply unravel and bunch up as you tighten the fixture, ruining the seal.
With your threads clean and wrapped, the prep work is complete, and you are ready to install the new hardware.
5. Installing Your New Single-Handle Faucet and Diverter
Installing a single-handle tub shower valve starts with the cartridge, the internal engine that mixes your water. Pay close attention to the “UP” arrow or “H” and “C” markings on the plastic face; installing this backward creates a safety hazard where “Cold” delivers scalding water. Slide the new unit into the wall valve until it seats firmly, ensuring the rubber O-rings (the black circular seals) do not pinch or twist.
Secure the assembly with the bonnet nut or retaining clip as shown in the manufacturer’s guide. Hand-tighten this piece first, then give it a gentle quarter-turn with pliers. Applying too much force acts like a vice that can crack the brass body or distort the internal pressure spool, causing stiff handle movement.
Thread your new spout onto the taped pipe until it fits snug against the wall without scratching the tile. This fixture houses the diverter, which acts like a traffic cop forcing water up to the showerhead. Check for signs of a failing diverter immediately by ensuring the pull-knob slides up and down freely without feeling “crunchy” or gritty.
Finally, attach the decorative trim plate and handle, ensuring they fully cover the hole spacing cut into your shower wall. If the handle rubs against the plate, loosen the mounting screws slightly to center the alignment before tightening them down.
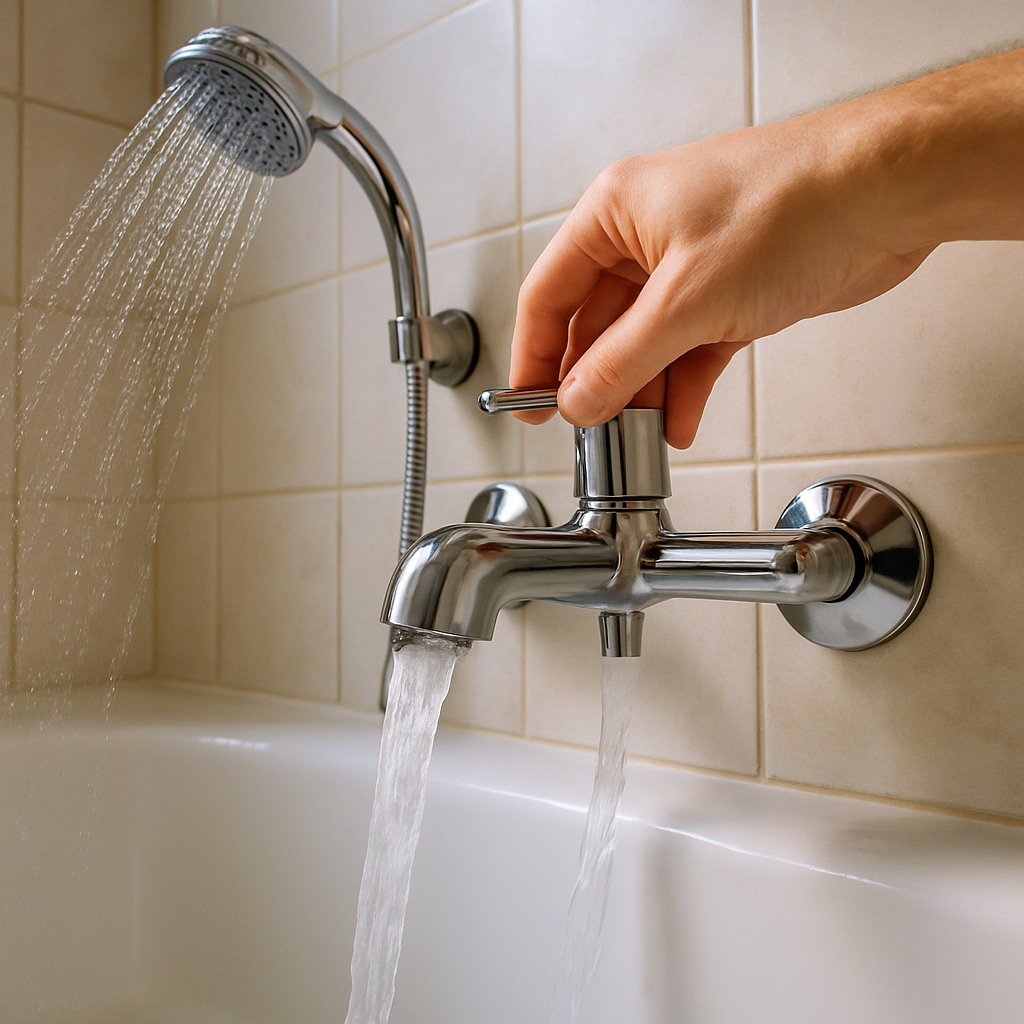
With the hardware mounted, turn the water back on.
6. The Victory Lap: Sealing the Deal and Testing Pressure
Even a tiny gap between your cover plate and the tile invites mold. Apply 100% silicone—the best waterproof sealant for bathroom fixtures—around the top and sides, leaving the bottom open so trapped moisture drains. Smoothing this bead with a wet finger feels like frosting a cake; aim for a seamless seal.

Sediment stirred up during repairs often clogs the aerator, so check that mesh screen first when troubleshooting low water pressure. Complete your project with this safety check:
- Turn on the water slowly to prevent pressure surges from damaging seals.
- Inspect the spout connection at the wall for any trickling leaks.
- Engage the diverter to ensure the showerhead spray is strong and consistent.
Keep Your Fixture Flowing: Maintenance Tips
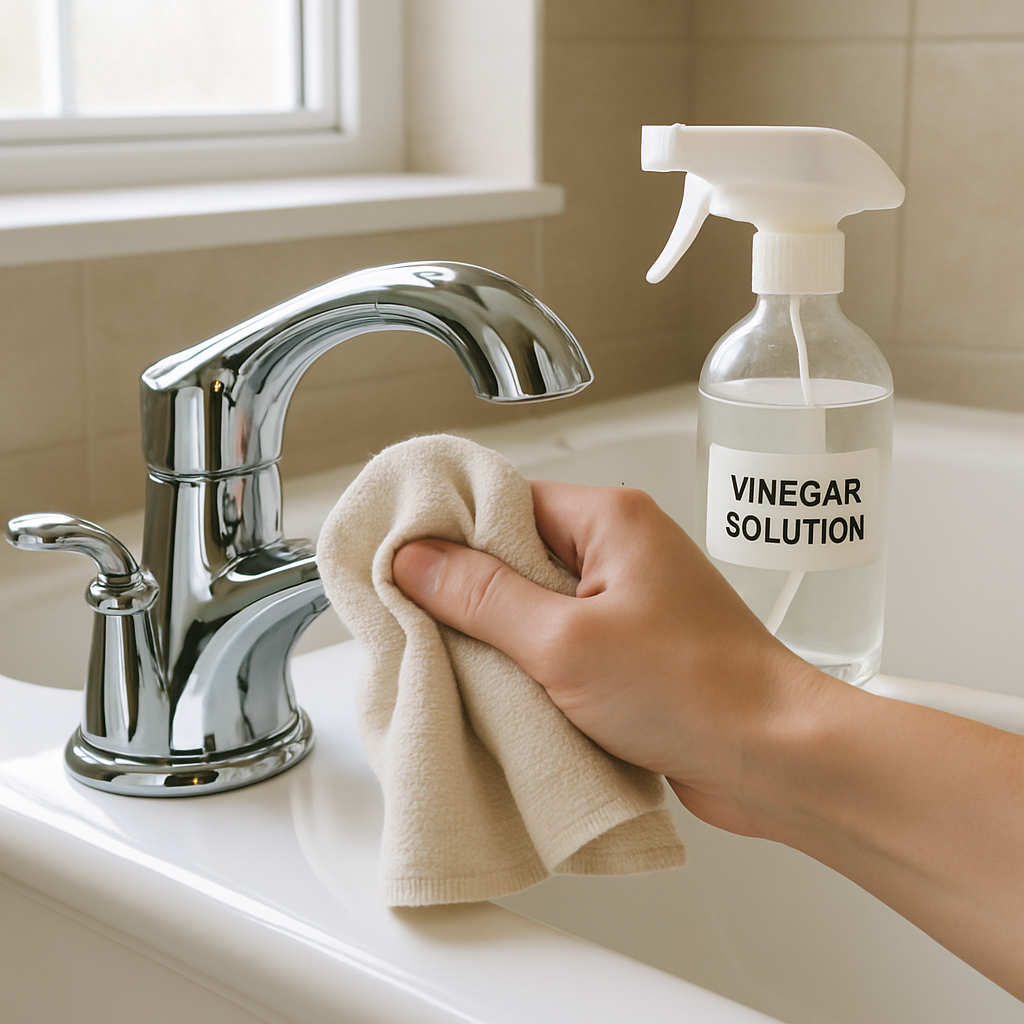
You’ve successfully stopped the leak, but regular care ensures it stays fixed. If you eventually notice a “gritty” resistance when turning the handle, recognize this as an early sign of wear. To prevent stuck parts later, a simple monthly vinegar wipe-down stops mineral scale from hardening. Keep the manufacturer instructions handy, though consistent cleaning will significantly extend your new fixture’s life.
Tackling plumbing repairs feels intimidating, but you’ve proven that patience is the only real requirement. You didn’t just swap a fixture; you saved a plumber’s bill and reclaimed your bathroom. Enjoy that drip-free silence.